Testing web applications using BDD with Behave and Selenium
- 5.15 Technologies
- Jul 5, 2023
- 5 min read
Updated: Aug 22, 2023
Behavior Driven Development (BDD) is a software development methodology. Emphasizing collaboration among developers, testers, and business stakeholders. BDD uses the plain English language to describe the behavior of a system ensuring the system meets business requirements. Behave is a Python-based BDD framework that facilitates defining, implementing, and testing software application behaviors. Selenium is a web testing framework that allows you to automate web browsers for testing purposes.
This blog will explore how to use Behave and Selenium modules to test a Django website. A website for testing is assumed, and we will be focusing on topics other than the web app development process. Alternatively, all code used can be found here:
Web Application
For the purpose of testing, a basic Django web application will be used. The web app includes multiple pages and forms. The images below provide an overview of the pages intended for automated testing.
The first page on the web app is the home page. The image below illustrates the home page, which offers user registration, login functionalities, and links to user dashboards and profiles.

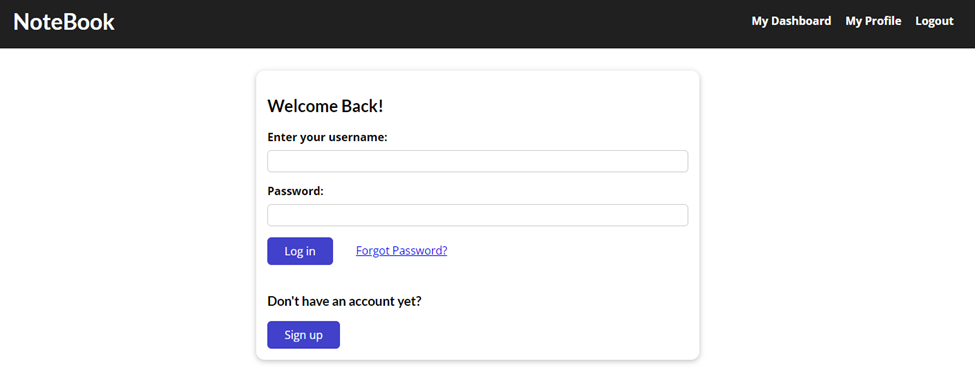
When the user clicks on the "Login" button, they are redirected to a page where they can enter their username and password. The page displayed below will be used for automated testing and features a straightforward form with a few text inputs and buttons.

Installing Behave and Selenium
Before we can begin scripting, it's necessary to install Python and create a Python Virtual Environment. For the purposes of this blog, we will assume both are already set up. To use both, Behave and Selenium, we need to install the packages. A simple 'pip install' command will do the trick.
pip install behave
pip install selenium
Implementing BDD with Behave
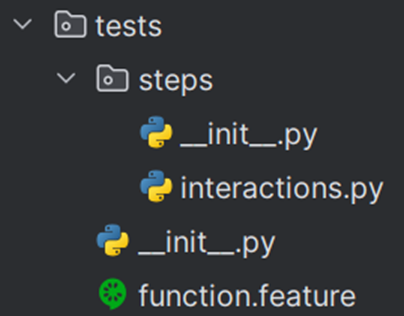
After successfully installing the packages, the next step is to create a folder named "tests" within our project directory. This folder is going to serve as the storage location for our tests. When running our tests later in the blog, we will simply refer to the "tests" folder.
Inside the 'tests' folder, we need to create a feature file called 'function.feature'. This is to test the functionality of the login form. Additionally, we will need to create an implementation file named 'interactions.py' to execute each of the steps outlined in the feature. To keep our file structure organized, we will place our interactions file in a newly created folder named 'steps'.
The diagram below outlines the file structure described above.

The Gherkin syntax is used to describe the behavior of a system in Behave. It uses Given-When-Then statements to describe the preconditions, actions, and expected outcomes of a system. The code below describes the behavior of a sample user login system.
The scenario can be implemented in Behave by defining the steps that correspond to each statement in 'interactions.py'.
Feature: Test that pages have the correct functionality

Scenario: A User can login
            Given I am on the logon page
            When I enter “testuser” in the “id_username” field
            And I enter “testpass!” in the “id_password” field
            And I press the login button
Then I am on the dashboard page
function.feature
A summary of each step can be found below:
Our starting point is the step "Given I am on the login page" where Selenium initializes a new browser and navigates to the login page.
The action 'When I enter "testuser" in the "id_username" field' is performed by Selenium on the login page. In the implementation function for this step, we use regular expressions to handle generalized user input. We then access the field and send the provided data.
“When I enter “testpass!” in the “id_password” field” it’s similar to the "id_username" field as the implementation step function generalizes the user input by accepting a regex and passes it to the function. Note that it's NOT a best practice to have passwords in code. The password should either be passed in or pulled from a vaulting solution at runtime.
“When I press the login button” Selenium finds a button tag and clicks it.
The final step, 'Then I am on the dashboard page,' involves comparing the browser's URL after logging in to ensure that the user has been correctly redirected to their dashboard.
With functions.feature now configured; the next step is to develop interactions.py. This instructs Selenium on 'what' actions to perform at each step of the scenario. The Selenium module enables the automation of web interactions, including tasks like button clicks, form filling, and page navigation. To do this, Selenium uses a web driver of your choice. There are plenty to choose from, but for this example, we are using a Chrome web driver. We define the steps corresponding to each statement in the Gherkin scenario using the @given, @when, and @then decorators in interactions.py.
Within interactions.py, we can see several step implementations:
From behave import *
From selenium import webdriver
From selenium.webdriver.common.by import By

use_step_matcher(‘re)

@given(‘I am on the login page’)
def step_impl(context):
            # Starts a browser and navigates to the login page
            context.browser = webdrive.Chrom(‘django_capstone_site\webdriver\chromedriver’)
            context.browser.get(‘http:/127.0.0.1:8000/login/’)

@then(‘I am on the dashboard page’)
def step_impl(context):
            # Test to make sure the browser URL is on the dashboard page
            expected_url = ‘http://127.0.0.1:8000/dashboard/’
            assert context.browser.current_url == expected_url

@when(‘I enter “(.*)” in the “(.*)” field’)
def step_impl(context, content, field_name):
            # Send content to element by id of field_name
            context.browser.find_element(By.ID, field_name).send_keys(content)

@when(‘I press the login button’)
def step_impl(context):
            # Finds a button element and clicks it
context.browser.find_element(By.TAG_NAME, ‘button’).click()
interactions.py
Executing our Tests
Now that we have our files defined, it is time to run the script and review the output. Depending on your Python environment setup, running the script in a terminal may have a different syntax.
Below outline both of the possibilities:
Virtual Environment:
python \venv\Scripts\behave.exe testsNon-Virtual Environment:
python behave testsInterpreting the Output
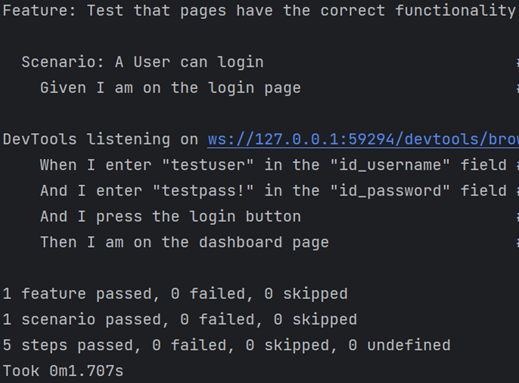
After running our tests, the status of each will be displayed in the terminal. The output will be broken down into steps, scenarios, and features. The figure below is an example of the output. Since all steps passed in the scenario, our feature file passed successfully.

Solution Overview
Utilizing Behave and Selenium for web application testing brings clarity to the testing process. Ensuring consistent execution each time. The example we discussed today was relatively straightforward, encompassing a single scenario. However, this approach can be expanded to encompass testing the entire website. Enhancements can be made by configuring automated testing of web application builds within a CI/CD pipeline. Guaranteeing functionality for every code push. Testing Web Applications using Behave and Selenium
Script Download
You can access this script and supporting files at the following location. Simply “git clone” the repository and run it against your test environment.
Disclaimer: While this may go without saying, “Do NOT test this in your production environment.” References
To learn more about the topics discussed, please visit the following:
Selenium: https://pypi.org/project/selenium/
Chrome Drivers: https://chromedriver.chromium.org
Django: https://www.djangoproject.com/
If you found this blog helpful or require assistance with web application testing, whether it's for a more advanced or comprehensive solution, please don't hesitate to reach out to our account management team. We would be glad to explore how we can assist.


Comments